react
jsx
- 作为文本 直接在 JSX 标签内:
<h1>{name}'s To Do List</h1>有效,但<{tag}>Gregorio Y. Zara's To Do List</{tag}>无效。 - 作为属性 紧跟在
=符号之后:src={avatar}将读取avatar变量,但src="{avatar}"将传递字符串"{avatar}"。 - 要在 JSX 中传递一个 JS 对象,必须将对象封装在另一对大括号中:
person={{ name: "Hedy Lamarr", inventions: 5 }}
任何 JavaScript 表达式都可以在大括号之间工作,包括像 formatDate() 这样的函数调用:
const today = new Date(); |
// 使用 &&,只有当 isPacked 为 true 时,你才能有条件地渲染复选标记: |
传递属性
function Avatar({ person, size }) { |
function Profile(props) { |
children
function Card({ children }) { |
子组件向父子间传递数据
父组件将回调函数作为属性传给子组件, 子组件通过回调函数传递数据
import React, { useState } from 'react'

const ChildComponent = ({onDataFromChild}) => {
    const [inputValue,setInputValue] = useState('');
    const sendDataToParent=()=>{
        onDataFromChild(inputValue)
    }
  return (
    <div>
        <h2>ChildComponent</h2>
        <input type="text" onChange={(e)=>setInputValue(e.target.value)}/>
        <button onClick={sendDataToParent}>Send Data to Parent</button>
    </div>
  )
}

export default ChildComponent
context
// app
import { createContext, useState } from 'react';
import './App.css';
import ParentComponent from './ParentComponent';
const appContext = createContext();
function App() {
  const [value,setValue] = useState('');
  const updateValue = (data) =>{
    setValue(data)
  }
  return (
    <appContext.Provider value={{value,updateValue}}>
      <ParentComponent/>
    </appContext.Provider>
  );
}
export default App;
export {appContext}

// parent
import React, { useContext } from 'react'
import ChildComponent from './ChildComponent'
import {appContext} from './App'
const ParentComponent = () => {
    const context = useContext(appContext)
  return (
    <div>
        <h3>ParentComponent</h3>
        <ChildComponent/>
        <p>Data From Child: {context.value}</p>
    </div>
  )
}
export default ParentComponent

// child
import React, { useContext, useState } from 'react'
import {appContext} from './App'

const ChildComponent = () => {
    const context = useContext(appContext);
    const [inputValue,setInputValue] = useState('');

  return (
    <div>
        <h2>ChildComponent</h2>
        <input type="text" onChange={(e)=>setInputValue(e.target.value)}/>
        <button onClick={()=>context.updateValue(inputValue)}>Send Data to Parent</button>
    </div>
  )
}
export default ChildComponent
事件
React 假定你编写的每个组件都是纯函数。
function Button({ onClick, children }) { |
hooks
There are two main usage rules the React core team stipulates you need to follow to use hooks which they outline in the hooks proposal documentation.
- Don’t call Hooks inside loops, conditions, or nested functions
- Only Call Hooks from React Functions
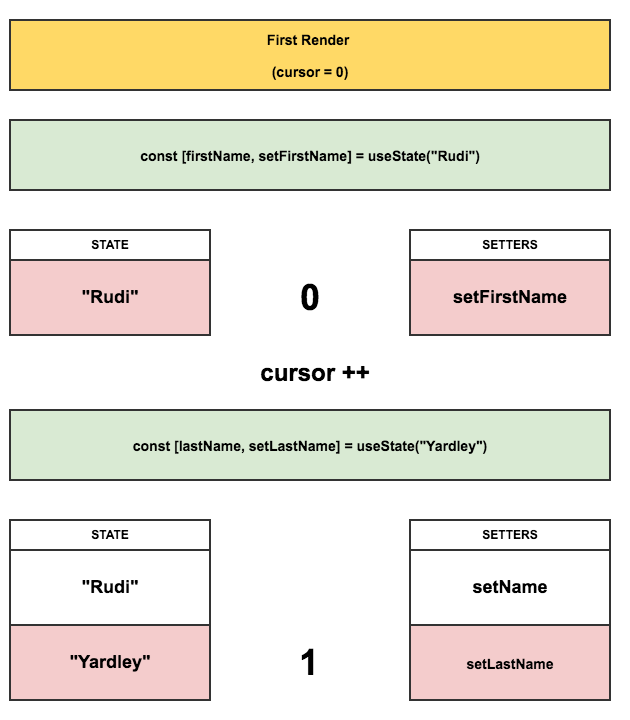
example but not real internal implementation
let state = []; |
So now it should be clear as to why you cannot call use hooks within conditionals or loops. Because we are dealing with a cursor pointing to a set of arrays, if you change the order of the calls within render, the cursor will not match up to the data and your use calls will not point to the correct data or handlers.
状态
- 识别 你的组件的不同视觉状态
- 确定 是什么触发了这些状态变化 状态转移
- 使用
useState表示 内存中的状态 - 移除 任何非必要的状态变量
- 连接 事件处理程序设置状态
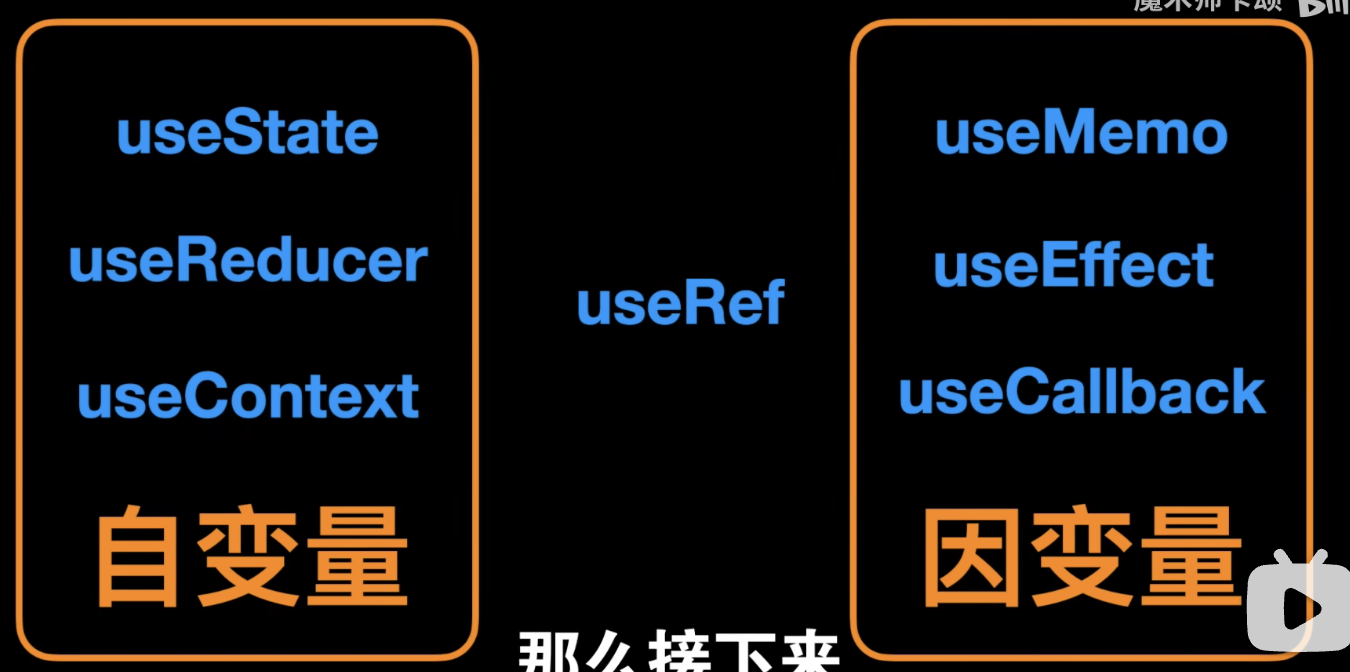
- useState 定义自变量
- useMemo 和 useCallback 定义因变量, 但是当自变量不变时, 即使重新渲染也只会读取自变量的 cache 而不重新计算, useMemo 和 useCallback 一个定义变量一个定义函数
- useEffect 定义副作用的因变量, 一个函数如果给定输入, 输出是确定的而且不影响其他部分,就是纯函数, 除此之外为副作用, 如修改 dom, 请求数据等
- useReducer 是自变量的集合
- useContext 解决了因变量作为自变量需要一级级往下传递的问题, 即跨组件
- useRef 是在自变量影响因变量的过程中定义标记变量
useState
import { useState } from 'react'; |
状态传递
import { useState } from 'react'; |
重新渲染与 ui 树 请记住,键不是全局唯一的。 它们只指定父级中的位置。 key
useReducer
使用 reducer 管理状态与直接设置状态略有不同。 不是通过设置状态来告诉 React “做什么”,而是通过从事件处理程序中分派 “操作” 来指定 “用户刚刚做了什么”。 (状态更新逻辑将存在于其他地方!)因此,你不是通过事件处理程序执行 “设置 tasks“,而是调度 “添加/更改/删除任务” 操作。 这更能描述用户的意图。
会触发重新渲染
reducer 函数是放置状态逻辑的地方。 它有两个参数,当前状态和操作对象,并返回下一个状态:
import { useReducer } from 'react'; |
useContext
不使用 prop 从父传递数据到子
export default function Section({ level, children }) { |
useRef
该组件不会随着ref每次增量而重新渲染
useRef(initialValue) is a built-in React hook that accepts one argument as the initial value and returns a reference (aka ref). A reference is an object having a special property current. reference.current accesses the reference value, and reference.current = newValue updates the reference value. Pretty simple.
- The value of the reference is persisted (remains unchanged) between component re-renderings;
- Updating a reference doesn't trigger a component re-rendering.
const myref = useRef(null) |
useEffect
Effects 会在渲染后运行一些代码,以便可以将组件与 React 之外的某些系统同步。
函数组件中 side effect 是不允许的
这些 side effect 写入 useEffect 中, 当 dependency 改变时执行函数体, Effect 允许你指定由渲染本身,而不是特定事件引起的副作用 Effect 通常用于暂时“跳出” React 代码并与一些 外部 系统进行同步。
返回清理函数
useEffect 在组件渲染完成后(即“挂载”时)会执行一次,然后在每次组件重新渲染后都会执行。但是,通过依赖数组,你可以控制 useEffect 的触发时机。
过程
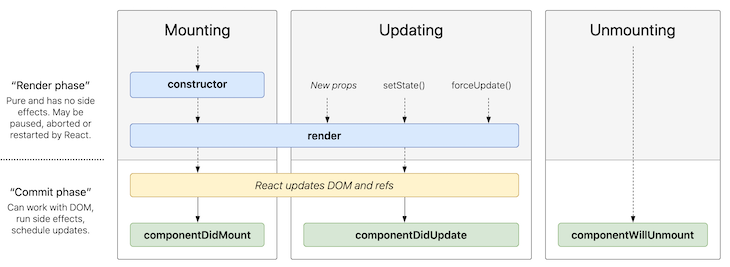
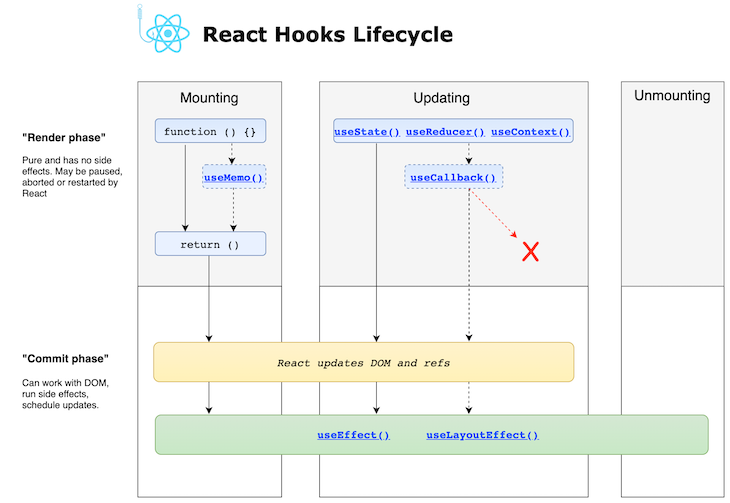
- Initial render/mounting: When a functional component that contains a
useEffectHook is initially rendered, the code inside theuseEffectblock runs after the initial render of the component. This is similar tocomponentDidMountclass components - Subsequent renders: You can pass a dependency array as the second argument to the
useEffectHook. This array contains variables or values that the effect depends on. Any change in these variables will re-render the component. If no dependency array is given, the effect will run on every render - Cleanup function: You can also run an optional cleanup function inside the effect. It is used to clean up any resources or subscriptions created by the effect when the component is unmounted or when the dependencies change
- Unmounting: If a cleanup function is present, it is run and then the component is unmounted from the DOM
useEffect( |
https://blog.logrocket.com/useeffect-react-hook-complete-guide/
useMemo
执行大量计算时使用
只要 dependency 不变就会返回原本数据的 cache 只有 dependency 改变才会执行计算
This hook caches (memoizes) a computed value and recomputes it only when required. The expensive function which comptues the value will only run when its dependencies have changed.
const expensiveCalculation = (num) => { |
useCallback
This hook caches (memoizes) the function and recreates it only when required. The array of dependencies is important, it helps React understand when to return the memoized function and when to re-create it (refer 5)
因为函数在重新渲染时也会重建, useCallback 会记住指定的函数
渲染
渲染必须始终为 纯计算, 在 “严格模式” 开发时,React 会调用每个组件的函数两次,这可以帮助表面因函数不纯而导致的错误。
- 触发 渲染(将客人的订单送到厨房)
- 这是组件的 初始渲染。
- 组件(或其祖级之一)的 状态已更新。
- 渲染 组件(在厨房准备订单)
- 在初始渲染时, React 将调用根组件。
- 对于后续渲染, React 将调用其状态更新触发渲染的函数组件。
- 提交 到 DOM(将订单放到桌上)
- 对于初始渲染, React 将使用
appendChild()DOM API 将它创建的所有 DOM 节点放在屏幕上。 - 对于重新渲染, React 将应用最少的必要操作(在渲染时计算!)以使 DOM 匹配最新的渲染输出。
- 对于初始渲染, React 将使用
- 渲染完成并且 React 更新 DOM 后,浏览器将重新绘制屏幕。 尽管此过程称为 “浏览器渲染”,但我们将其称为 “绘制” 以避免在整个文档中造成混淆。
“渲染” 表示 React 正在调用你的组件,这是一个函数。 从该函数返回的 JSX 就像 UI 的及时快照。 它的属性、事件处理程序和局部变量都经过计算, 在渲染时使用它的状态。 当 React 重新渲染一个组件时:
- React 再次调用你的函数。
- 你的函数返回一个新的 JSX 快照。
- 然后 React 更新屏幕以匹配函数返回的快照。
<button onClick={() => { |
状态变量的值在渲染中永远不会改变, 即使其事件处理程序的代码是异步的。 在处理状态更新之前,React 会等到事件处理程序中的所有代码都已运行 多个 setNumber()形成队列, 下一次渲染前依次调用
你应该 将你放入状态的任何 JavaScript 对象视为只读。可以做的是替换而不是改变
setPerson({ |
redux
概念
action: 事件, action 是一个具有
type字段的普通 JavaScript 对象, 按照惯例,我们将该信息放在名为payload的字段中。action creator 是一个创建并返回一个 action 对象的函数
state
reducer: 接收 state 和 action作为其参数,并返回新 state 给应用的函数 reducer 函数内部的逻辑通常遵循以下步骤:
- 检查 reducer 是否关心这个 action
- 如果是,则复制 state,使用新值更新 state 副本,然后返回新 state
- 否则,返回原来的 state 不变
- 检查 reducer 是否关心这个 action
Store: store 是通过传入一个 reducer 来创建的,并且有一个名为
getState的方法,它返回当前状态值const store = configureStore({ reducer: counterReducer })
console.log(store.getState())
// {value: 0}dispatch: 更新 state 的唯一方法是调用
store.dispatch()并传入一个 action 对象。 store 将执行所有 reducer 函数并计算出更新后的 statestore.dispatch({ type: 'counter/increment' })
store.dispatch(increment())
console.log(store.getState())
// {value: 1}Selector 函数可以从 store 状态树中提取指定的片段。随着应用变得越来越大,会遇到应用程序的不同部分需要读取相同的数据,selector 可以避免重复这样的读取逻辑
const selectCounterValue = state => state.value
const currentValue = selectCounterValue(store.getState())
console.log(currentValue)
// 2
“slice” 是应用中单个功能的 Redux reducer 逻辑和 action 的集合, 通常一起定义在一个文件中。该名称来自于将根 Redux 状态对象拆分为多个状态 “slice”。
import { createSlice } from '@reduxjs/toolkit'
export const counterSlice = createSlice({
  name: 'counter',
  initialState: {
    value: 0
  },
  reducers: {
    increment: state => {
      state.value += 1
    },
    decrement: state => {
      state.value -= 1
    },
    incrementByAmount: (state, action) => {
      state.value += action.payload
    }
  }
})
export const { increment, decrement, incrementByAmount } = counterSlice.actions
export default counterSlice.reducer

console.log(counterSlice.actions.increment())
// {type: "counter/increment"}
const newState = counterSlice.reducer(
  { value: 10 },
  counterSlice.actions.increment()
)
console.log(newState)
// {value: 11}
thunk: 它允许你将 thunk 函数 直接传递给
store.dispatch。调用 thunk 函数时总是将(dispatch, getState)作为它的参数,你可以根据需要在 thunk 中使用它们。const logAndAdd = amount => {
return (dispatch, getState) => {
const stateBefore = getState()
console.log(`Counter before: ${stateBefore.counter}`)
dispatch(incrementByAmount(amount))
const stateAfter = getState()
console.log(`Counter after: ${stateAfter.counter}`)
}
}
store.dispatch(logAndAdd(5))
数据流
- 初始启动:
- 使用最顶层的 root reducer 函数创建 Redux store
- store 调用一次 root reducer,并将返回值保存为它的初始
state - 当视图 首次渲染时,视图组件访问 Redux store 的当前 state,并使用该数据来决定要呈现的内容。同时监听 store 的更新,以便他们可以知道 state 是否已更改。
- 更新环节:
- 应用程序中发生了某些事情,例如用户单击按钮
- dispatch 一个 action 到 Redux store,例如
dispatch({type: 'counter/increment'}) - store 用之前的
state和当前的action再次运行 reducer 函数,并将返回值保存为新的state - store 通知所有订阅过的视图,通知它们 store 发生更新
- 每个订阅过 store 数据的视图 组件都会检查它们需要的 state 部分是否被更新。
- 发现数据被更新的每个组件都强制使用新数据重新渲染,紧接着更新网页
应用
import { createSlice } from '@reduxjs/toolkit' |
// store.js |
redux-toolkit
- store 管理着所有的 state, 通过其中的的 reducer 将发生的 action 处理生成新的 action
- slice 是 store 的一部分, 可以在其中定义 state 和 reducer createSlice is a higher order function that accepts an initial state, an object full of reducer functions and a slice name. 将 slice 注册到 store 是用 slice.reducer 注册的
- useSelector(store => store.slice.state)
- const dispathc = useDispatch()
props
Props are the read-only properties that are shared between components to give the unidirectional flow of React a dynamic touch. They're mainly shared from the parent component to the child component
PropTypes are simply a mechanism that ensures that the passed value is of the correct datatype. This makes sure that we don’t receive an error at the very end of our app by the console which might not be easy to deal with
AuthGuard.propTypes = { |
cors
在标准互联网通信中,您的浏览器向应用程序服务器发送 HTTP 请求,以 HTTP 响应的形式接收数据,然后显示数据。在浏览器术语中,当前浏览器 URL 被称为当前来源,而第三方 URL 则是跨源的。
当您发出跨源请求时,请求-响应过程如下:
- 浏览器在请求中添加来源标头,其中包含有关当前来源的协议、主机和端口的信息
- 服务器检查当前来源标头,然后使用请求的数据和 Access-Control-Allow-Origin 标头进行响应
- 浏览器查看访问控制请求标头并与客户端应用程序共享返回的数据
或者,如果服务器不想允许跨源访问,则会回复一则错误消息。
https://www.ruanyifeng.com/blog/2016/04/cors.html
CORS是一个W3C标准,全称是"跨域资源共享"(Cross-origin resource sharing)。
对于简单请求,浏览器直接发出CORS请求。具体来说,就是在头信息之中,增加一个Origin字段。Origin字段用来说明,本次请求来自哪个源(协议 + 域名 + 端口)。服务器根据这个值,决定是否同意这次请求。 如果Origin指定的源,不在许可范围内,服务器会返回一个正常的HTTP回应。
// 请求 |
非简单请求的CORS请求,会在正式通信之前,增加一次HTTP查询请求,称为"预检"请求(preflight)。浏览器先询问服务器,当前网页所在的域名是否在服务器的许可名单之中,以及可以使用哪些HTTP动词和头信息字段。只有得到肯定答复,浏览器才会发出正式的XMLHttpRequest请求,否则就报错。
mui
component prop
The component used for the root node. Either a string to use a HTML element or a component.
In the button component from the MUI library, it is possible to pass in one of these components to render in for that button and provide some useful logic or styling in that area. In the case of a string, you can provide the name of default HTML elements (think input, div, a etc) and MUI will render one of these elements instead. In this case you are selecting a label element which is commonly used alongside an input element.
Typography 排版
<Typography variant="h4">Register</Typography> |
next
_app, _document
auth js
https://authjs.dev/reference/express
https://medium.com/@jibla/auth-js-exploration-1b6c27cf076f
Sessions refer to the practice of maintaining authentication artifacts on the server side, while the client only holds the session id (in a cookie or local storage). The server holds the actual authentication data, including user data and roles.
Tokens, on the other hand, are client-side mechanisms for maintaining authentication. With tokens, there is no need to hold the authenticated user’s data on the server. Instead, all necessary information is contained within the tokens, which are saved on the client-side. Tokens come in various types, with one of the most popular being JSON Web Tokens (JWT). Other types include API keys, OAuth artifacts, SSL/TLS certificates, and others. All of these are different forms of tokens with different properties.
First, you need to verify the user’s identity using one of several methods (username and password, magic links, API tokens, or OAuth).
Second, you need to save the authentication artifact and use it for subsequent HTTP requests.
Finally, you need to establish a way to refresh the authentication artifact. This overall schema remains consistent, regardless of the specific authentication method used.
主旨
- 组件:React 应用程序是使用组件构建的,组件是定义用户界面各部分的外观和行为的自包含代码单元。这些组件可以组合起来创建 UI 设计。借助React UI库,您可以创建漂亮的交互界面。React 社区提供了React 库来测试应用程序中的组件,使开发人员更容易高效地编写和运行测试。
- 状态:状态是一种存储数据的方式,这些数据可以在组件中随时间变化。状态由组件本身管理,可以使用 setState() 方法或 useState() 挂钩进行更新。
- Props:Props 是属性的缩写,它们用于将数据从一个组件传递到另一个组件。道具是只读的,这意味着它们不能被接收它们的组件修改。
- 生命周期方法:生命周期方法是在组件存在的不同阶段调用的特殊函数。它们用于执行诸如获取数据、更新状态、清理资源或执行副作用等操作。
虚拟 DOM
React 通过利用虚拟 DOM 进行操作,虚拟 DOM 充当真实 DOM(文档对象模型)的副本,反映网页的布局和内容。 虚拟 DOM 不是实际的 DOM,而是保存在内存中的实际 DOM 的表示, 它是 DOM 节点的树格式表示,只是一个普通的 JavaScript 对象。 每次 React 组件更新时,React 都会在内存中构建一棵新树。每次更新时在内存中创建 javascript 对象比更新实际 DOM 快得多,因为执行 DOM 操作的成本很高。
{ |
diffing 算法
该算法非常复杂,但它基于两个假设:
- 不同类型的两个元素会产生不同的树。
- 开发人员可以使用 key prop 暗示哪些子元素在不同的渲染中可能是稳定的。
state 是什么
state 冗余:
function Message({ messageColor }) { |
这里,一个 color state 变量被初始化为 messageColor 的 prop 值。这段代码的问题在于,如果父组件稍后传递不同的 messageColor 值(例如,将其从 'blue' 更改为 'red'),则 color state 变量将不会更新! state 仅在第一次渲染期间初始化。 这就是为什么在 state 变量中,“镜像”一些 prop 属性会导致混淆的原因。
通常我们把包含“不受控制”状态的组件称为“非受控组件” 当组件中的重要信息是由 props 而不是其自身状态驱动时,就可以认为该组件是“受控组件”。
只要一个组件还被渲染在 UI 树的相同位置,React 就会保留它的 state。 如果它被移除,或者一个不同的组件被渲染在相同的位置,那么 React 就会丢掉它的 state。 如果是相同位置的相同组件 state 会保留, 使用 key 区分相同组件的不同实例保证不同实例 state 会重置
- 当你想要整合两个组件时,将它们的 state 移动到共同的父组件中。
- 然后在父组件中通过
props把信息传递下去。 - 最后,向下传递事件处理程序,以便子组件可以改变父组件的 state 。
- 考虑该将组件视为“受控”(由 prop 驱动)或是“不受控”(由 state 驱动)是十分有益的。
https://www.freecodecamp.org/news/what-is-state-in-react-explained-with-examples/
setState()是一个异步函数 多次 setState 可能会合并为一次 render(batching) 为了得到 setState 之后的结果, 可以:
handleClick() { |
但是建议: Why is using componentDidUpdate more recommended over the setState callback function? 原因如下: https://stackoverflow.com/questions/56501409/what-is-the-advantage-of-using-componentdidupdate-over-the-setstate-callback#answer-56502614
Context
context 允许父组件向其下层无论多深的任何组件提供信息,而无需通过 props 显式传递。
?
useimmer